Every web developer starts where you are right now. Confused about how all of this stuff works. Welcome to the starting point. HTML is the foundation of every web site on the internet, and is a necessary starting point.
The goal of this guide is to keep it simple and to the point. Only the core elements that most developers use on a daily basis are covered.
Styling will be covered in the CSS guide.
Table of contents
- Picking a good HTML editor
- Create a project folder
- Installing the HTML Boilerplate
- Create your first HTML file
- The template structure overview
- Elements – What are they?
- Attributes – What are they?
- Heading Elements
- Paragraph Elements
- Text Formatting Tags
- Hyperlink Elements – Web Links and Email Links
- List Elements
- Comment Tag
- Break Tag
- Image Elements
- Horizontal Rule Tag
- Building Tables
- Creating a form
- HTML Cheat Sheet
Picking a good HTML editor
There are literally hundreds of HTML editors on the internet to choose from. Visual Studio Code is one of the best on the market. This is a free cross platform editor built by Microsoft. It has support for almost any language you can think of. If it is missing support for a language, there is probably and extension for it. Download Visual Studio Code.Visual Studio Code is the editor I will be using in the examples shown in this guide.
Create a project folder
The first thing you should do is create a project folder. I keep a folder on my C drive simply named Projects. Within that folder I have sub directories for each project I build. For this project create a sub directory inside the Projects folder and name it Robots. I will assume you have this folder for the rest of the guide.
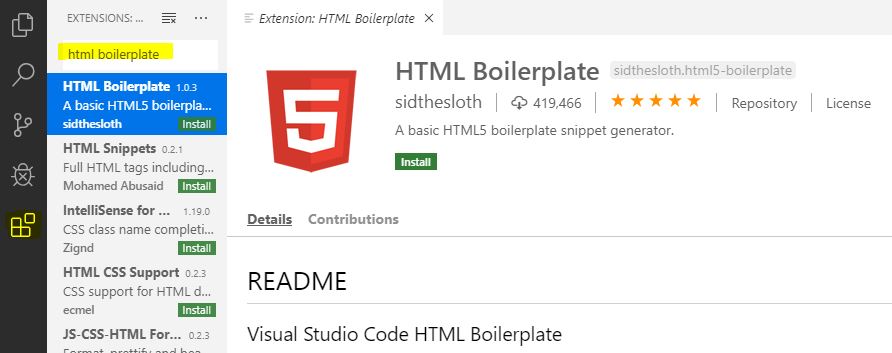
Installing the HTML Boilerplate
After installing Visual Studio Code you will want to add your first extension with the steps below.
- Activate the extension list by clicking the last icon on the left navigation pane.
- Then search for HTML Boilerplate, hi-light it and click the green Install button.
- After installing read through the details to get an idea about how to use this extension.
We will discuss how to use the boilerplate below.
Create your first HTML file
To create your first HTML file we will be using the HTML Boilerplate you installed in the last section.First, create a new file in Visual Studio Code. Do this by clicking the first icon in the left navigation pane. Alternatively you can select File → New File.After that you want to save the file. Select File → Save the file to your Robots sub directory in your Projects folder and name it index.html
Now that the file has been saved you can just start typing HTML at the top, then select the html5-boilerplate option.
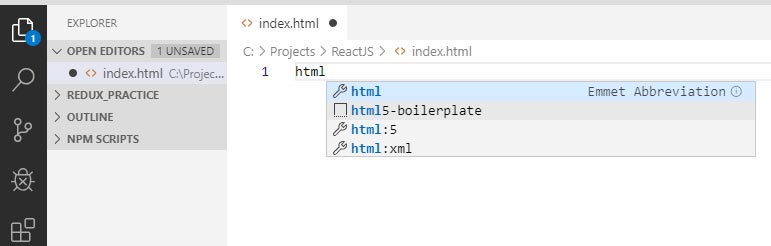
That should inject a template that looks like this block of code. If for some reason that didn’t work you can copy it from the window below and paste it into your index.html file.
<!DOCTYPE html>
<!--[if lt IE 7]>      <html class="no-js lt-ie9 lt-ie8 lt-ie7"> <![endif]-->
<!--[if IE 7]>         <html class="no-js lt-ie9 lt-ie8"> <![endif]-->
<!--[if IE 8]>         <html class="no-js lt-ie9"> <![endif]-->
<!--[if gt IE 8]><!--> <html class="no-js"> <!--<![endif]-->
    <head>
        <meta charset="utf-8">
        <meta http-equiv="X-UA-Compatible" content="IE=edge">
        <title></title>
        <meta name="description" content="">
        <meta name="viewport" content="width=device-width, initial-scale=1">
        <link rel="stylesheet" href="">
    </head>
    <body>
        <!--[if lt IE 7]>
            <p class="browsehappy">
            You are using an <strong>outdated</strong> browser. Please
           <a href="#">upgrade your browser</a> to improve your experience.
           </p>
        <![endif]-->

        <script src="" async defer></script>
    </body>
</html>
The template structure overview
The template you see below is the same template from above, but I removed any unnecessary code.
Notes in red have been added to hi-light the reason for each section.
<!DOCTYPE html><!--The html tag tells the server that this is an HTML file-->
    <head><!--The head section holds information about the document or links to supporting files-->

        <!--meta tags hold information either about the author, the file itself or formatting instructions-->
        <meta charset="utf-8">
        <meta http-equiv="X-UA-Compatible" content="IE=edge">
        <meta name="description" content="">
        <meta name="viewport" content="width=device-width, initial-scale=1">

        <!--This is a link to the CSS stylesheet, the href would link to the CSS file-->
        <link rel="stylesheet" href="">
    </head>
    <body>
        <!--The body holds all the data such as tables, images and links-->
    </body>
</html>
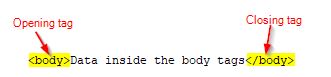
Elements – What are they?
An HTML element is a container for data and consists of an opening tag and a closing tag. Some examples of elements are html, title, head, body, br, image and table.
See the image below as an example of the structure.
Attributes – What are they?
Most HTML tags can also have attributes. An attribute is a way of adding additional information to an element. Attributes are always added to the first tag of the element.
The sections hi-lighted in the image below are examples of attributes. By adding bgcolor=”#CCCCCC” to the body element you would change the page color to gray. When adding the title tag you would be able to show a message whenever someone hovers over that section on your web page.

Heading Elements
Heading elements are used to display a title for a section of text. There are 6 tags H1 (large) – H6 (small).
<h1>H1 Heading</h1>
<h2>H2 Heading</h2>
<h3>H3 Heading</h3>
<h4>H4 Heading</h4>
<h5>H5 Heading</h5>
<h6>H6 Heading</h6>
H1 Heading
H2 Heading
H3 Heading
H4 Heading
H5 Heading
H6 Heading
Paragraph Element
The <p> element is used to define paragraph content in an html document.
Text formatting Tags (Can also be set in CSS)
<b>Bold</b>
<i>Italic</i>
<u>Underline</u>
Italic
Underline
Hyperlink Elements – Web Links and Email Links
<a href="http://robotsneedcoffee.com/">Robots Need Coffee</a>
<a href="mailto:test@example.com?subject=Time for the HTML party">Party Tonight!</a>
List Elements
Unordered List - Items will be marked with bullets.
<ul>
     <li>List item 1</li>
     <li>List item 2</li>
     <li>List item 3</li>
     <li>List item 4</li>
</ul>

Ordered List - Items will be marked with numbers.
<ol>
     <li>List item 1</li>
     <li>List item 2</li>
     <li>List item 3</li>
     <li>List item 4</li>
</ol>
Unordered List – Items will be marked with bullets.
- List item 1
- List item 2
- List item 3
- List item 4
Ordered List – Items will be marked with numbers.
- List item 1
- List item 2
- List item 3
- List item 4
Comment Tag
<!--I am a comment, I will be hidden from the browser-->
Break Tag – Will force a line break where placed
<br/>
Image Element – Used for adding an image
<img src="https://upload.wikimedia.org/wikipedia/commons/4/45/A_small_cup_of_coffee.JPG">

Horizontal Rule Tag – Creates a horizontal line wherever used
<hr/>
Table Element – Creates a table
<table border="1" cellpadding="3" cellspacing="3" width="100%">
  <tr>
    <th align="left">Month - Heading for first column</th>
    <th align="left">Charge - Heading for second column</th>
  </tr>
  <tr>
    <td>December - first column</td>
    <td>$50 - second column</td>
  </tr>
</table>
| Month – Heading for first column | Charge – Heading for second column |
|---|---|
| December – first column | $50 – second column |
Form Element – Used to build forms
<form method=post action="confirm.php">
<input type="text" name="EmployeeFirstName"  placeholder="Enter First Name" maxlength="30">

Select from drop down list:<br>
<select>
<option>First Option</option>
<option>Second Option</option>
<option>Third Option</option>
</select>

Select one option:<br>
<input type="radio" name="option"> Option 1
<input type="radio" name="option" checked> Option 2
<input type="radio" name="option"> Option 3

<input type="Submit" value="Submit Form" disabled>
</form>
This has been a short introduction to HTML. If you need additional help take a look at the Languages\Education section of my Resources page. You may also want to have a look at the Learn CSS Basics tutorial.
HTML Cheat Sheet
Below is a simple list of the tags discussed above, and any important attributes have been noted.
Core Elements
<html>
    <head>
    <meta name="Description" content="Description related to your site">
    <meta name="keywords" content="Keywords related to your site">
        <title>Title of your web page</title>
    <link rel="stylesheet" type="text/css" href="style.css">
    </head>
    <body>HTML web page contents </body>
</html>

<head> Contains elements describing the document </head>
<link> Is used to load load content from internal or external sources.
<body> Content of page goes here </body>
<title> Title of page or site, appears in browser tab </title>
Heading Elements – Largest to Smallest
<h1>H1 Heading</h1>
<h2>H2 Heading</h2>
<h3>H3 Heading</h3>
<h4>H4 Heading</h4>
<h5>H5 Heading</h5>
<h6>H6 Heading</h6>
Paragraph Element
<p>Robots Need Coffee</p>
Text formatting Tags (Can also be set in CSS)
<b>Bold</b>
<i>Italic</i>
<u>Underline</u>
Hyperlink Elements
<a href="http://robotsneedcoffee.com/">Robots Need Coffee</a>
<a href="mailto:test@example.com?subject=Time for the HTML party">Party Tonight!</a>
List Elements
Unordered List - Items will be marked with bullets.
<ul>
     <li>List item 1</li>
     <li>List item 2</li>
     <li>List item 3</li>
     <li>List item 4</li>
</ul>

Ordered List - Items will be marked with numbers.
<ol>
     <li>List item 1</li>
     <li>List item 2</li>
     <li>List item 3</li>
     <li>List item 4</li>
</ol>
Comment Tag
<!--I am a comment, I will be hidden from the browser-->
Break Tag – Will force a line break where placed.
<br/>
Image Element – Used for adding an image.
<img src="https://upload.wikimedia.org/wikipedia/commons/4/45/A_small_cup_of_coffee.JPG">
Horizontal Rule Element – Creates a horizontal line wherever used.
<hr/>
Table Element – Creates a table.
<table border="1" cellpadding="3" cellspacing="3" width="100%">
  <tr>
    <th>Month - Heading for first column</th>
    <th>Charge - Heading for second column</th>
  </tr>
  <tr>
    <td>December - first column</td>
    <td>$50 - second column</td>
  </tr>
</table>
Form Element – Used to build forms.
<form method=post action="confirm.php">
<input type="text" name="EmployeeFirstName" placeholder="Enter First Name" maxlength="30">

Select from dropdown list:<br>
<select>
<option>First Option</option>
<option>Second Option</option>
<option>Third Option</option>

Select one option:<br>
<input type="radio" name="option"> Option 1
<input type="radio" name="option" checked> Option 2
<input type="radio" name="option"> Option 3

<input type="Submit" value="Submit Form">
</form>