Having a web server at home is a basic requirement for any Web Developer. Developers are constantly testing out new ideas and need a place to do that. Hosting is great for the finished product, but you really need the flexibility of a home testing environment. There are a lot of ways to build a home web server, but I am going to discuss the option that has worked best for me.
What will this guide do for me?
After following this guide you will have your own dedicated hosting server. Capable of hosting as many web sites as you want. Each web site will have FTP Access, Unlimited Email Addresses and a Database.
Table of Contents
Who is this for?
This guide is for any web developer that needs a LAMP (Linux, Apache, MySQL, and PHP) testing environment. With this environment you will be able to test WordPress installs or any other CMS (Content Management System) that requires the LAMP stack. You could also test any custom PHP code if you are writing custom applications. This is also for anyone that wants a better understanding of how servers work.
Why do I need a web server?
I think every web developer should have their own web server. Having your own web server allows you to write code without restrictions. Plus, live testing your application in a production environment can be a bad idea.
Network Requirements
Router – Anything with 4 ports should work fine.
Static IP Address – Only needed if you plan to host your own websites, otherwise a dynamic address is fine.
Minimum Hardware Requirements
512 MB RAM.
10 GB HDD.
1GHz processor.
Installation Media (USB / DVD)
Install PuTTY
After following the installation instructions below, you will need a way to connect to your server over SSH. Most Linux admins use the PuTTY SSH client software for this task.
This will give you the ability to manage your server headless (without monitor, keyboard and mouse) from anywhere.
On your desktop computer you can download and install PuTTY from here: https://www.chiark.greenend.org.uk/~sgtatham/putty/
Installing the Debian Linux Server
Dedicated Computer
At this point I will assume you have a computer that you are going to dedicate to this. Please make sure it meets the Minimum Hardware Requirements stated above. Also note that any data on your computer will be lost after installing the software listed below.
What is Debian?
Debian is a free Linux based operating system originally developed in 1993 by Ian Murdock.
Download and Install Debian
The first thing we need is a clean install of Debian. Since we will be using the ISPConfig automated install script we can’t have a previous LAMP stack installed. So, follow this fantastic guide over at HowToForge.com to get this installed.
Debian Minimal Server Install Guide: https://www.howtoforge.com/tutorial/debian-minimal-server/
Installing ISPConfig
What is ISPConfig?
ISPConfig is an open source web based Hosting Control Panel. This sofware will allow you to manage an unlimited amount of clients and websites. For each website you can also add services such as FTP, Mail Accounts and a Database. You will also have built in Antivirus and Spam filtering.
For a full list of features check out their website here: https://www.ispconfig.org/
ISPConfig Automated Install
At this point you should have Debian installed. If so, then you are ready to install ISPConfig. We will be using the automated install script instructions found on HowToForge.com
Follow the ISPConfig Install Guide: https://www.howtoforge.com/tutorial/ubuntu-ispconfig-automated-install-script/
Connecting to ISPConfig, Adding your first website
At this point you should have installed Debian and ISPConfig. Lets walk through connecting to the ISPConfig web interface and setup your first website. You will need the IP address of your new server. I will assume it is 10.0.20.9 for the purpose of these instructions, replace it with your real IP address.
Tip: From your server command prompt you can issue the command sudo ifconfig to get your IP address.
The results from the sudo ifconfig command. Look in the eth1 section at the inet value.
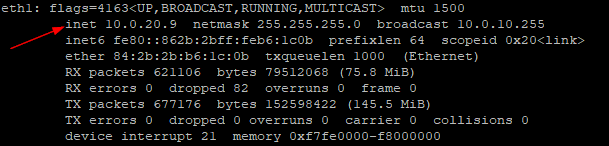
Okay, so using that information above connect to ISPConfig using this url: https://10.0.20.9:8080/login/
Login name: admin
Login pass: admin
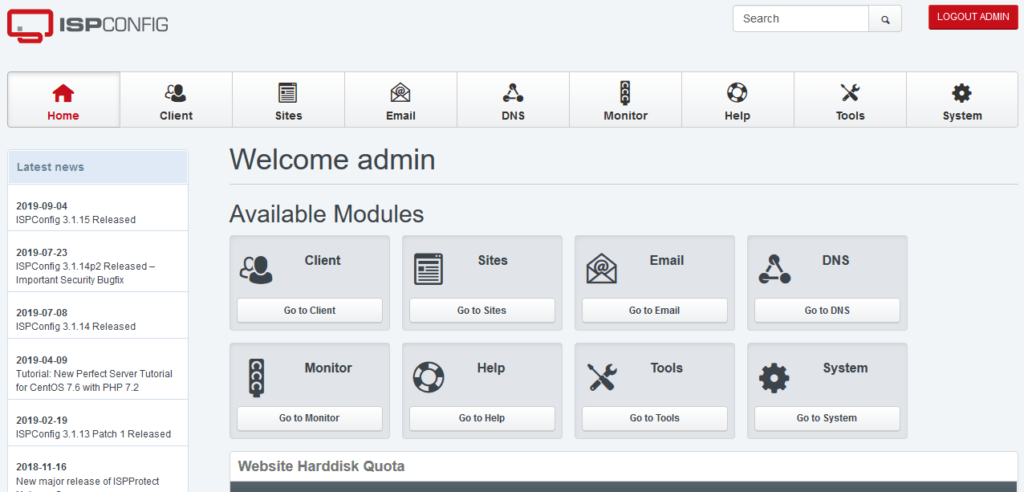
If everything went as expected you should see the management dashboard similar to the one pictured below.
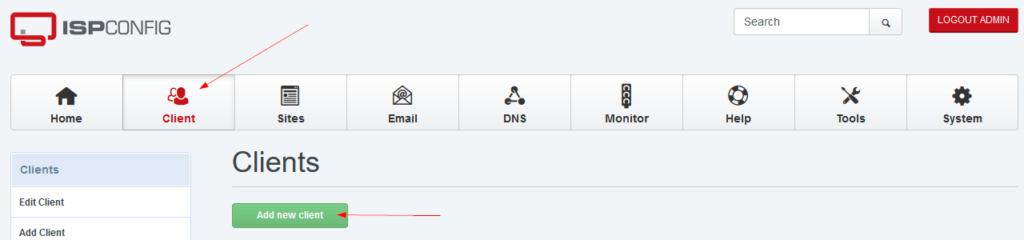
Create a Client
Click on the Client button in the top navigation bar, then click “Add new client”. When filling out the Client form you can just complete the required fields only if you want.
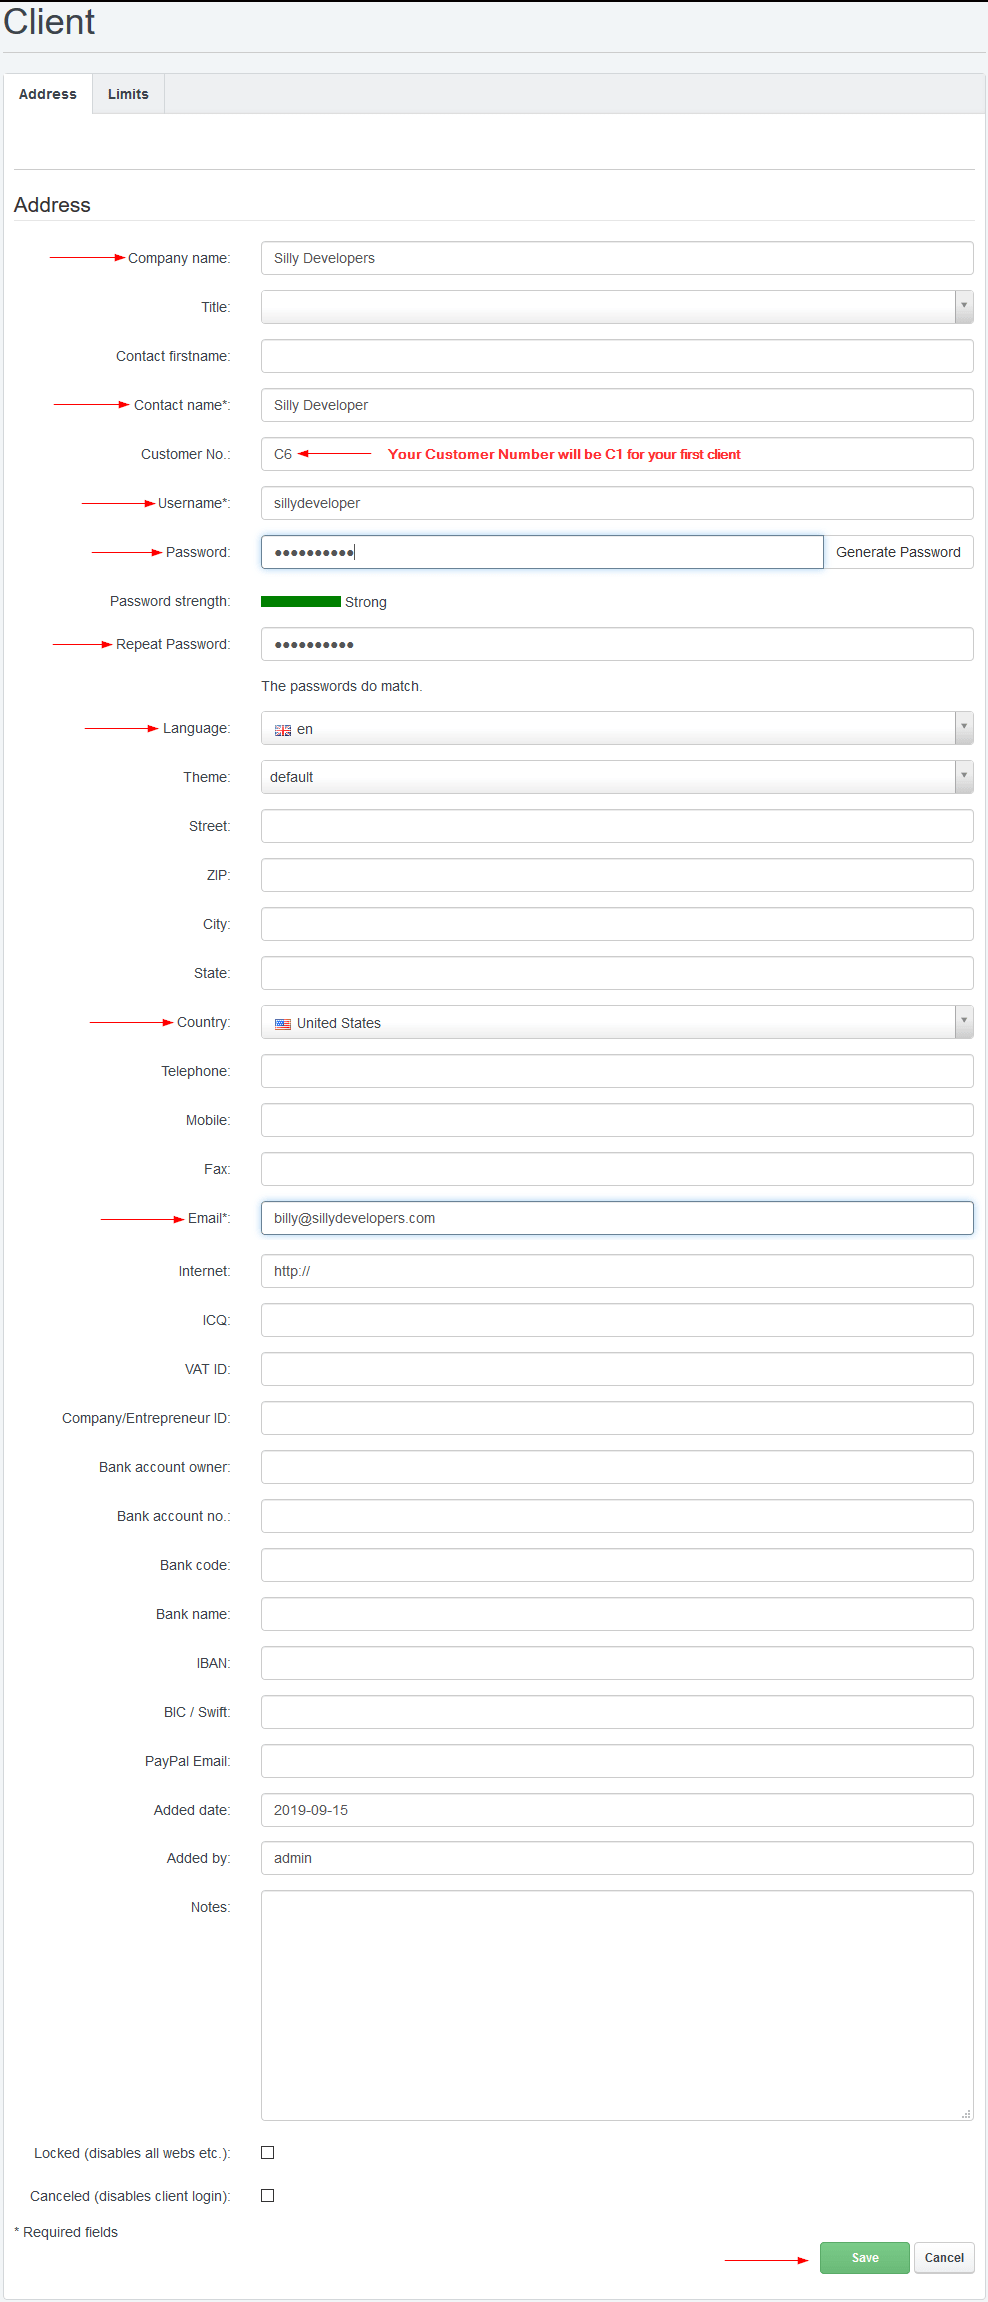
Fill out the form, the only required fields are the following.
- Contact name.
- Username.
- Email address.
- Password.
Create a Website
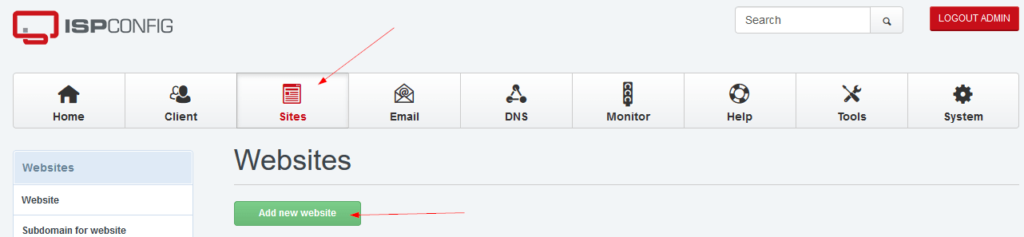
After adding your first client, let’s add a new website for that client. Select Sites from the top navigation menu, then click on “Add new website”.
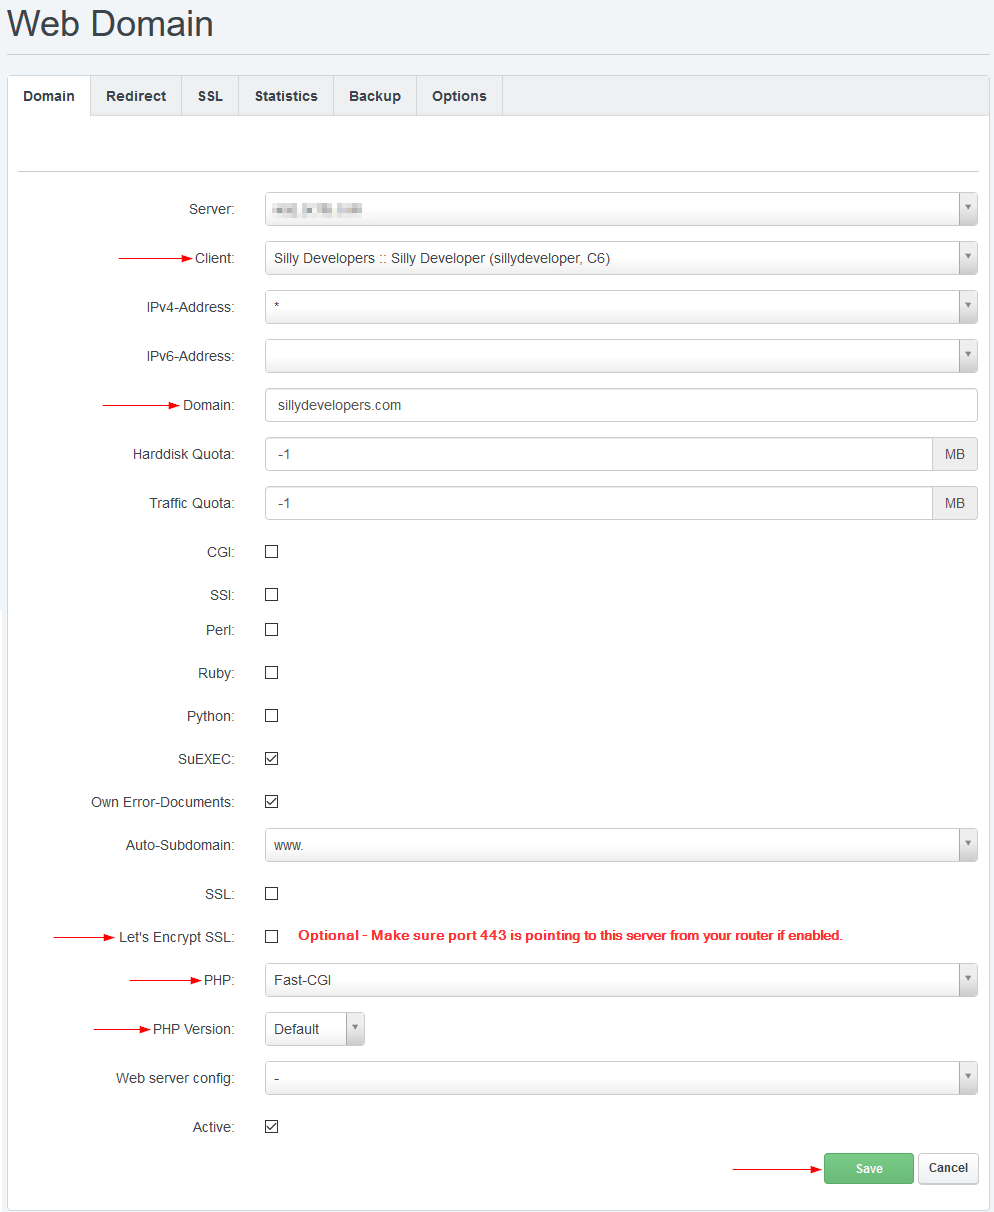
Fill out the form.
- Leave the server name as default.
- Choose your client name (the one you created above).
- Enter a domain name, this can be a domain name that you own, or a fake one if you are just testing.
- Choose Let’s Encrypt SSL if you have port 443 from your router pointing to your server IP address.
- PHP – Choose Fast-CGI from the dropdown.
- Save the form.
Create a Database User
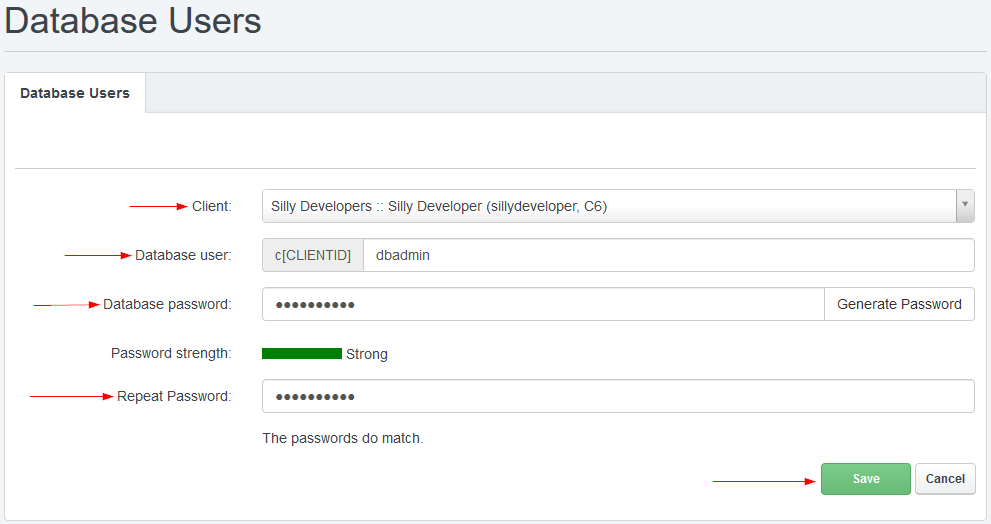
Lets add a new Database User. From the menu on the left click on Database Users, then click on “Add New User”.

Fill out the form, all fields are required here.
- Select your “Client” from the drop down list.
- Create a “Database User” – Example: using “dbadmin” would result in a user named “c1dbadmin”.
- Add your password.
- Save your settings.
Create a Database
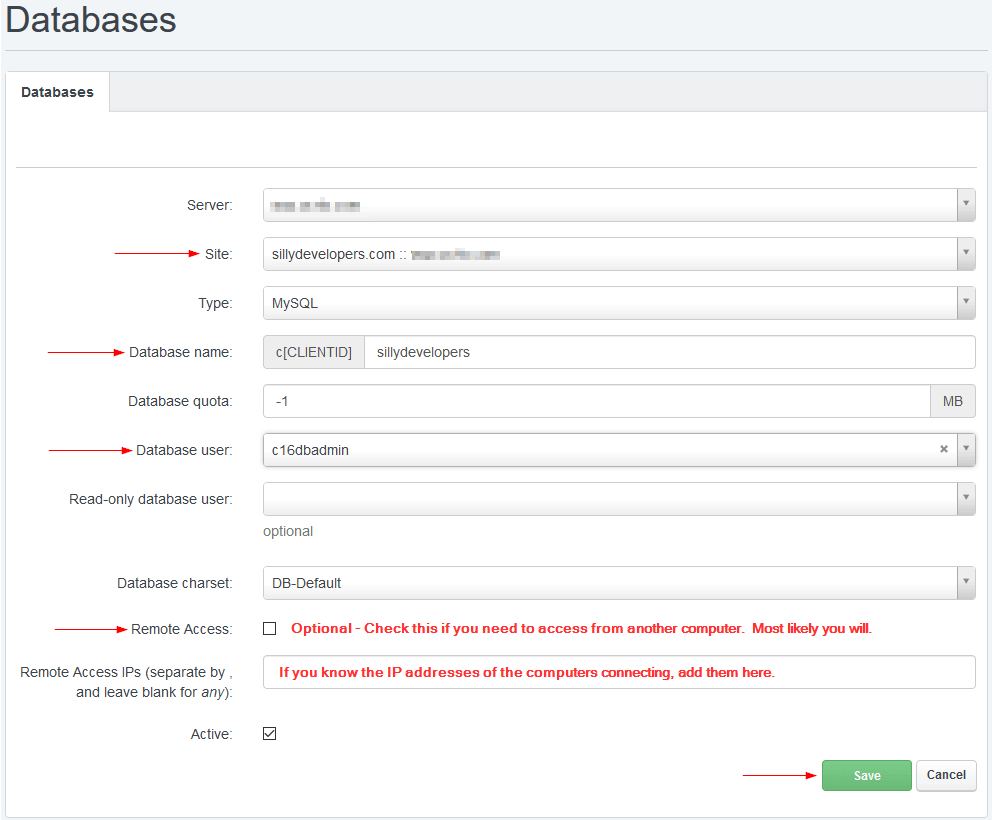
Let’s create a new database. On the left menu click on Databases, then click on “Add new Database”.
- Select the Website name from the Site drop down list.
- Add a Database name.
- Select the Database user.
- Decide if you need remote access or not, this can be changed later if you’re not sure.
- Save your settings.
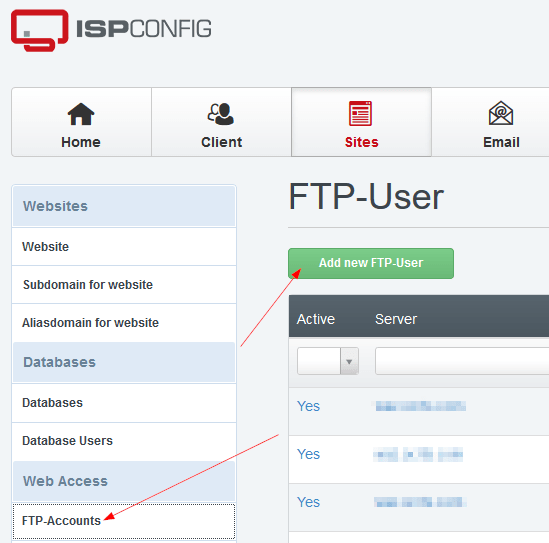
Create an FTP Account
The last thing we need to add is an FTP account. On the left hand menus select FTP-Accounts, the click on “Add new FTP-User”.
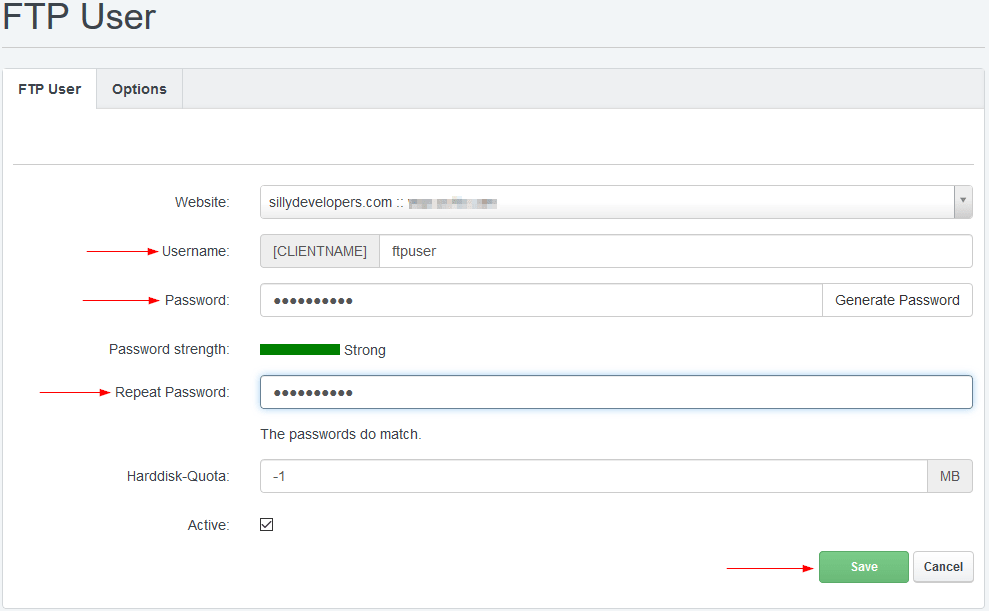
Fill out the FTP User form.
- Select your website.
- Create a Username – [CLIENTNAME] is equal to your client username. This will be joined to whatever you add here. For example: if your client username is “sillydeveloper” and you add “ftpuser” then your full FTP username will be “sillydeveloperftpuser”.
- Create your password.
- Save your settings.
Create an Email Domain
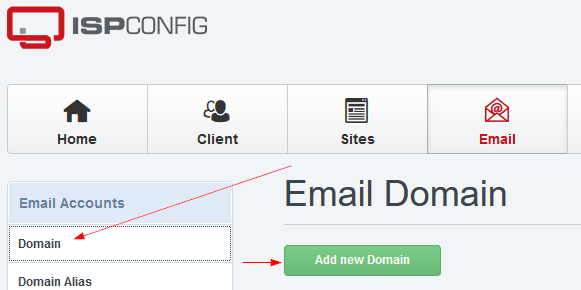
Let’s add an email domain.
- Select the “Email” option from the top navigation menu.
- Click the “Domain” option from the left navigation menu.
- Click “Add new Domain”.
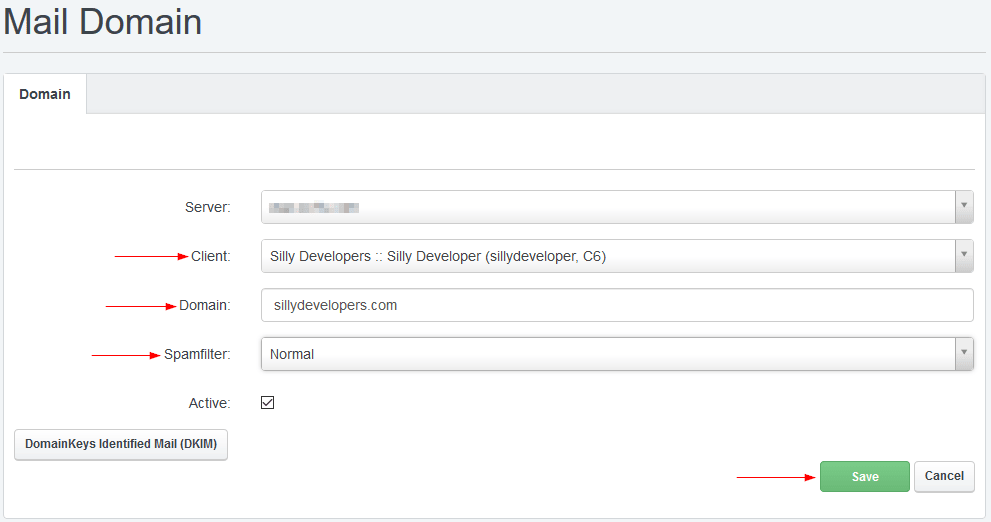
Fill out the Email Domain form.
- Select your “Client” from the drop down list.
- Add your “Domain”.
- Select “Normal” from the Spamfilter options, you can change this later if needed.
- Save your settings.
Create an Email account
Lets add an email account.
- Select “Email” from the top navigation bar.
- Select “Email Mailbox” from the left navigation.
- Click “Add new Mailbox”.

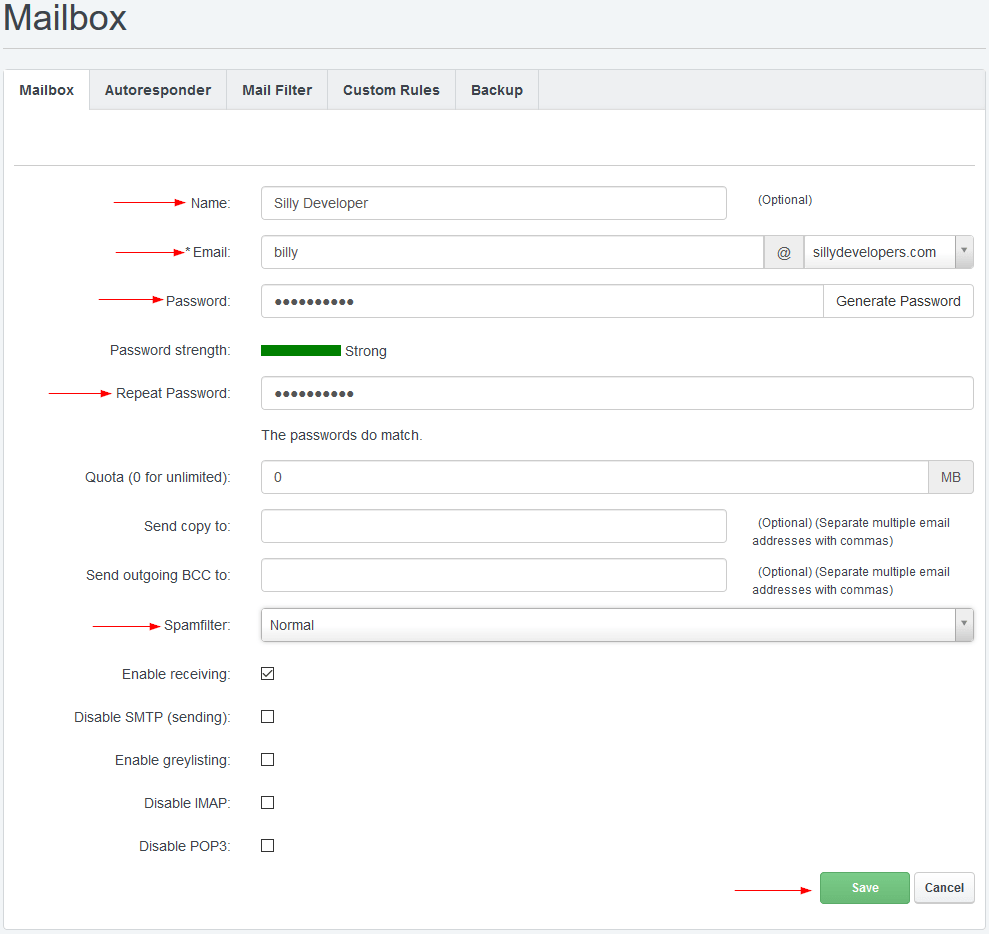
Email Account: Fill out the email form.
- Enter a name if you want to, I usually do.
- Add your email name, then select the domain name from the right.
- Create your password.
- If you enable the Spamfilter just choose Normal as a safe place to start.
- Save your settings.
At this point you should have the following things accomplished.
- Created a new Client.
- Created a new empty Website.
- Created a new Database user.
- Created a new Database.
- Created an FTP User account.
- Created an Email Domain.
- Created your first Email account.
Testing everything out
Before we go any further, check your router to make sure you are routing traffic for the following ports to your server IP address.
Ports:
| 20, 21 | File Transfer Protocol (FTP) |
| 22 | Secure Shell (SSH) |
| 25 | Simple Mail Transfer Protocol (SMTP) |
| 80 | HyperText Transfer Protocol (HTTP) |
| 110 | Post Office Protocol (POP3) |
| 143 | Internet Message Access Protocol (IMAP4) |
| 443 | HTTP with Secure Sockets Layer (SSL) |
There are two ways to see if your website is working.
The first would be to register the domain name that you used when setting up a website earlier. Then point that domain name to your public IP address. Then route that traffic through your router to your server.
The second way would be to just trick your operating system into routing the traffic to your server. This is done by modifying your hosts file. So, for this example I will assume that the website your created earlier was named “sillydevelopers.com“. I will also assume that your server IP address is “10.0.20.9“.
On your personal computer you want to edit your hosts file.
This file is usually located at the following location, at least it is on Windows 7 and above.
C:\Windows\system32\drivers\etc\hosts
Just open that file in notepad or any other text editor and add the following line.
10.0.20.9 sillydevelopers.com
After saving the hosts file you should be able to visit this url http//sillydevelopers.com and see the following page.
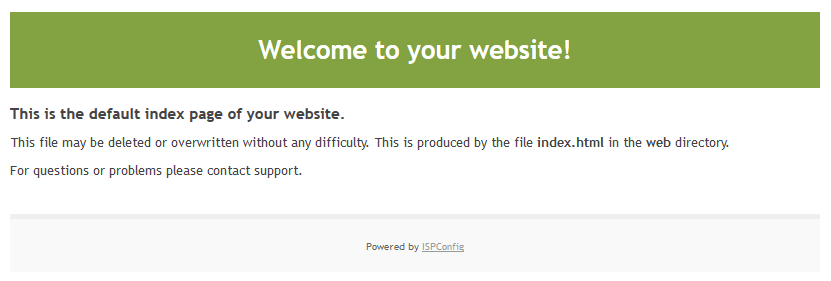
If you are able to see the default website then everything should be working.
Testing out the FTP connection
You will need an FTP client for this part.
I use the free client WinSCP, you can download that tool from here: https://winscp.net/eng/index.php
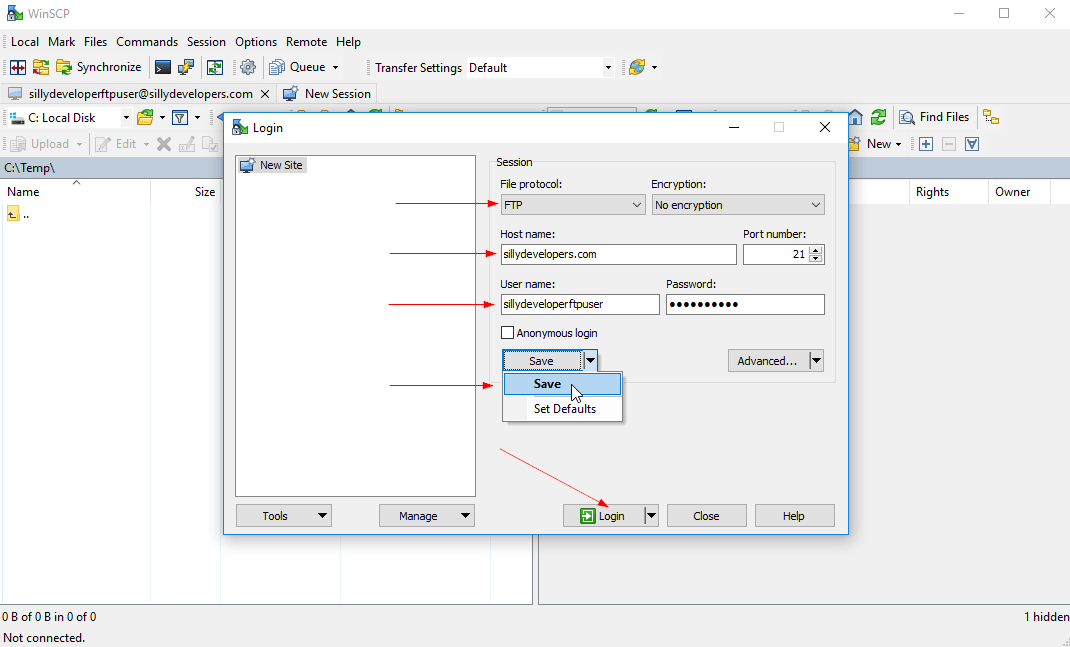
After installing WinSCP launch it and create your connection settings.
- Select FTP from the File Protocol drop down list.
- Host name – sillydevelopers.com
- User name – sillydeveloperftpuser
- Password – enter the password you created for your FTP user.
- Save your settings.
- Login
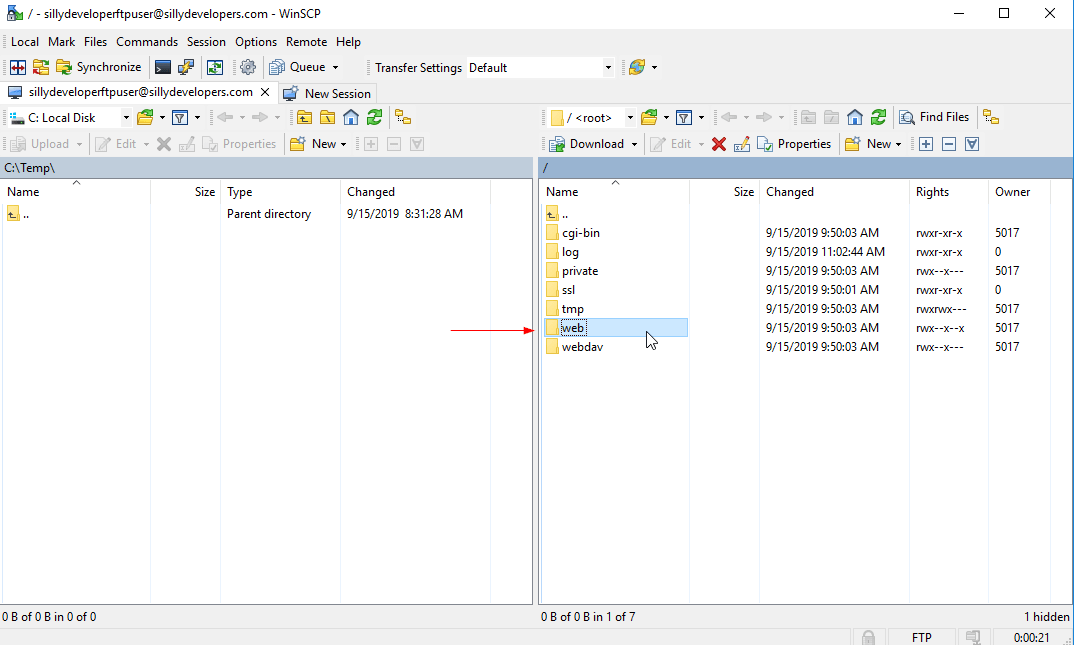
After logging in you should see a screen similar to the one below. All of your website files are in the web folder. So, any web pages or projects would need to be uploaded to this web folder.
Conclusion
At this point you should have everything you need to host your web sites and or projects. ISPConfig is a fantastic product and I hope you enjoy it as much as I do.